NOVATION LAUNCHPAD PRO
SETUP
Drivers
Windows (only): Download and install the Novation USB Driver from http://us.novationmusic.com/support/product-downloads?product=Launchpad+Pro
No driver is required to be installed for Mac OSX computers.
Connect the unit’s USB socket with a USB port of your computer and the included DC Power adapter to an AC plug.
VirtualDJ Setup
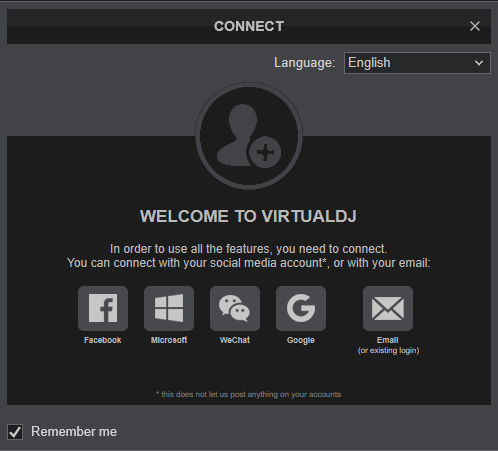
Once VirtualDJ is opened, a Connect Window will appear. Login with your virtualdj.com or your social media account’s credentials.
A Pro Infinity, a PLUS or a Pro Subscription License is required to use the Novation Launchpad Pro. Without any of the above Licenses, the unit will operate for 10 minutes each time you restart VirtualDJ.
https://www.virtualdj.com/buy/index.html
Click to OK.
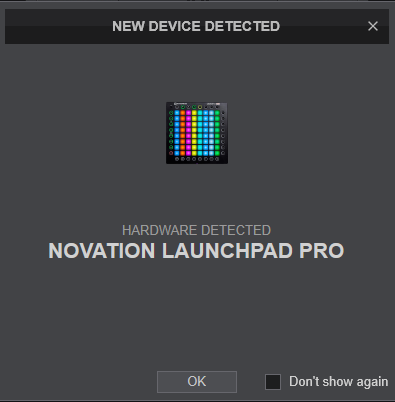
The unit is now ready to operate.
MIDI SETUP
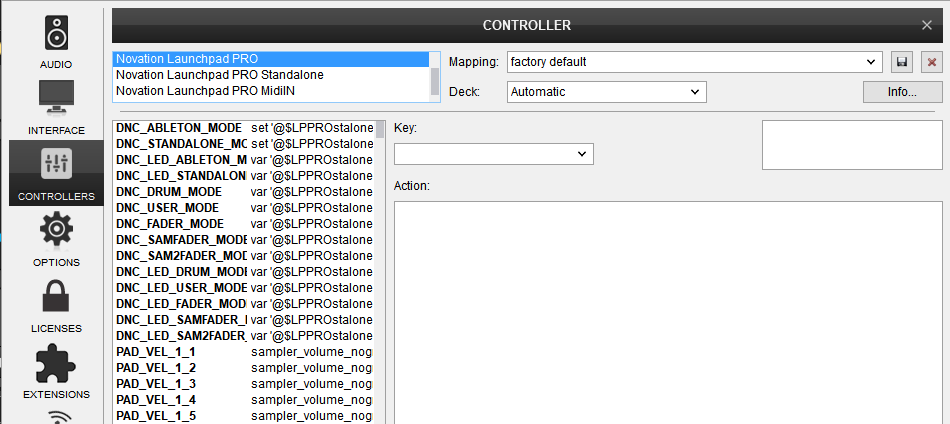
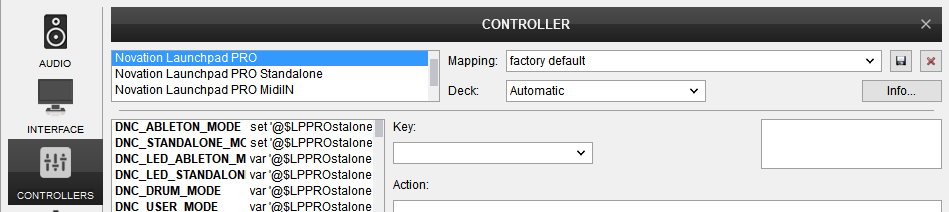
The unit should be visible in the CONTROLLERS tab of Config as 3 separate devices (Pro, Pro Standalone and Pro MidiIN) and the “factory default” available/selected from the Mappings drop-down list for each one of them.
The factory default Mapping of each device offers the functions described in this Manual, however those can be adjusted to your needs via VDJ Script actions.
Find more details at http://www.virtualdj.com/wiki/VDJscript.html
AUDIO SETUP
The unit is not offering any built-in audio interface and VirtualDJ will use your computer’s built-in sound card by default (if not any other is chosen).
Depending on the sound card you need to use, manually create the necessary Master and Headphones audio configuration. See more in Audio Setup of VirtualDJ Manual
For further software settings please refer to the User Guide of VirtualDJ 8.
http://www.virtualdj.com/manuals/virtualdj8/index.html
SAMPLER MODE
Press the top SESSION button, to set the device to Sampler mode (selected by default on start-up)

PADS
KEY
ACTION
SHIFT ACTION
When Record Arm button (Bottom 1st) is enabled, the pad records a new sample and ads it to the same slot position in the Recording Bank
* The Pads offer velocity. When enabled, the volume of the samples will be altered depending on how hard the pad is pressed. See further details at the Advanced Setup chapter
TOP BUTTONS
KEY
ACTION
SHIFT ACTION
LEFT BUTTONS
KEY
ACTION
SHIFT ACTION
RIGHT BUTTONS
KEY
ACTION
SHIFT ACTION
BOTTOM BUTTONS
KEY
ACTION
SHIFT ACTION
Press again to return to the default Trigger Sampler view.
Press again to return to the default Trigger Sampler view.
SAMPLER VOLUME MODE
When in Sampler mode, use the VOLUME button at the bottom [B5] to set Pads to Volume Control.

In this mode, the 8 columns of Pads adjust the Volume of the 1st to 8th sample of the selected Sampler Bank. Press a pad inside the column of the corresponding sampler slot to gradually* adjust its Volume from the minimum (zero) - when lowest pad is pressed - to the maximum (volume 100%) - when the upper pad is pressed.
* The speed that the volume will increase/decrease to the set value, depends on the velocity (how hard the pad is initially pressed).
The Colors of the Pads in the same column will automatically get the color of the sample (1 to 8).
Note that if a sample (1 to 8) is assigned to a Sampler group, adjusting its volume will also adjust the volumes of all samples that are assigned to the same group. Sampler groups are defined in Sampler Editor.
If you wish to adjust the Volume of a single sample, without affecting the volumes of the other samples in the same group, use the right-side arrow buttons (R1 to R8) to select a block of samples (1 to 8, 9 to 16 ... etc up to 57 to 64). When all right-side arrow buttons are off, the Pads in the 8 columns will adjust the volume of all samples in the same group.
When in Sampler mode, use the PAN button at the bottom [B6] to set the 64 Pads to Volume Groups Control. In this mode, the 8 columns represent the volumes of the available sampler groups in the selected Sampler bank. If no groups are defined/assigned to any sample, the pads/columns will have no functionality.
EFFECTS MODE
Press the top NOTE button, to set the device to Effects mode.
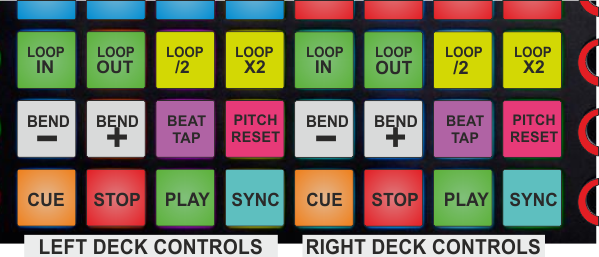
In this mode, the 32 left-side Pads along with the 4 left-side bottom buttons control the Effects on Left deck and the right-side pads and buttons, the Effects on the Right deck.
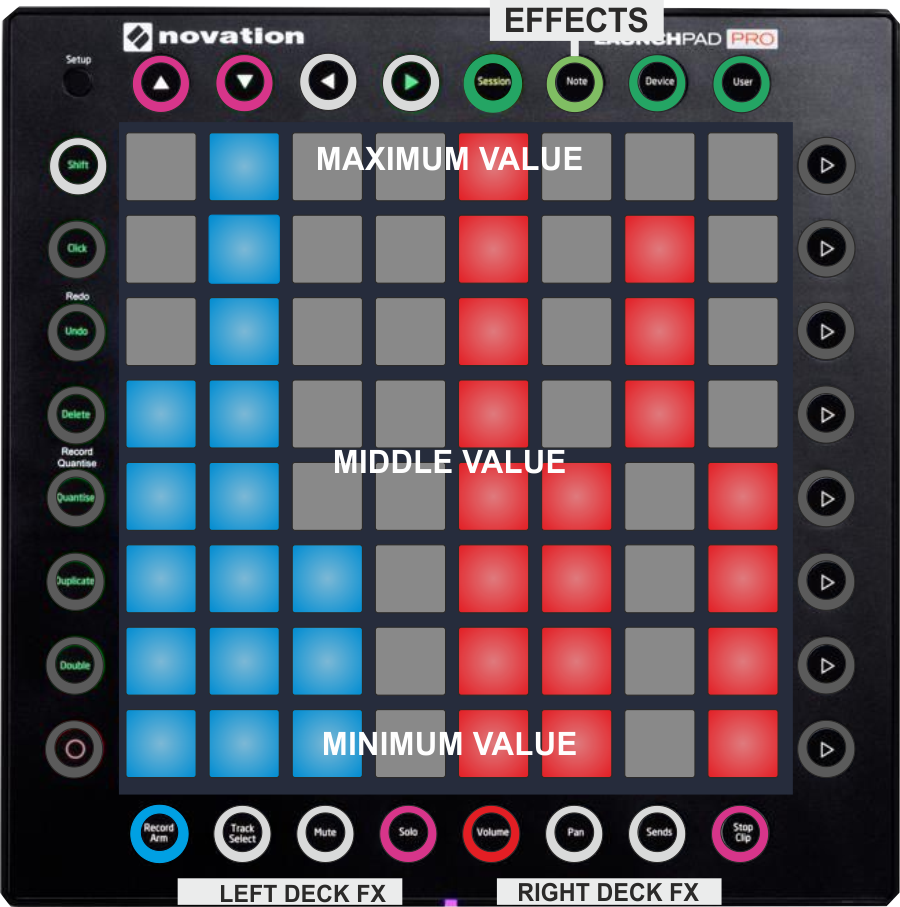
PADS
Press a pad to adjust the value of the Parameter of the selected Effect. The speed that the value will increase/decrease to the set value, depends on the velocity (how hard the pad is initially pressed).
The leds of the pads inside a column represent the current value of the Effect parameter in 2 patterns. Most of the Effect parameters have their "off" value at the minimum 0% and those get the "volume-style" pattern. Some others, have their "off" value at the middle, and those get the "pan-style" pattern where the 2 middle leds represent the center/off value.
KEY
ACTION
SHIFT ACTION
TOP BUTTONS
KEY
ACTION
SHIFT ACTION
LEFT BUTTONS
KEY
ACTION
SHIFT ACTION
RIGHT BUTTONS
KEY
ACTION
SHIFT ACTION
BOTTOM BUTTONS
KEY
ACTION
SHIFT ACTION
MIXER MODE
Press the top DEVICE button, to set the device to Mixer mode and get controls for Volume, Equalizer, EQ kills etc.
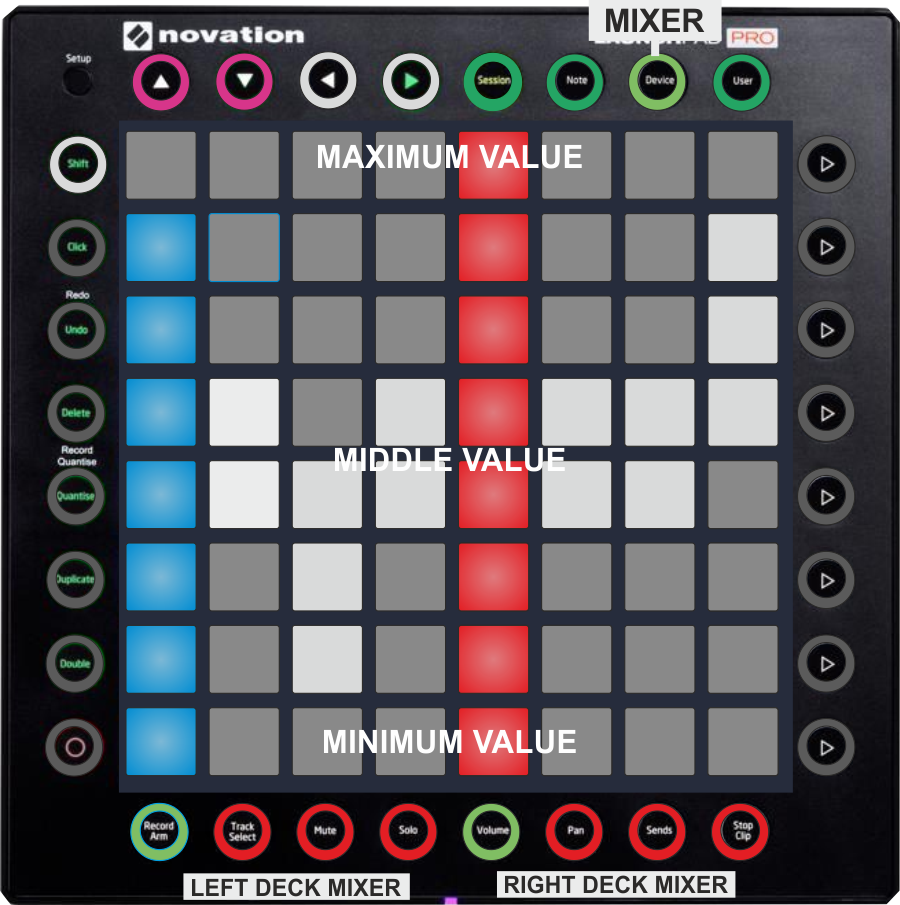
PADS
Press a pad inside a column to gradually adjust the left/right deck's volume or Equalizer band. The speed that the value will increase/decrease, depends on the velocity (how hard the pad was initially pressed). See Advanced Setup
The leds for Columns 1 and 5 represent the Volume of left/right assigned decks and will get the deck's color (green for deck 3, orange for deck 4) in a "volume-style" pattern.
The leds of the other columns represent the Equalizer bands values of left/right assigned decks, will always use white color and the "pan-style" pattern. When both middle leds (4th and 5th row) are lit, the value is set at 50% (centered Equalizer)
KEY
ACTION
SHIFT ACTION
TOP BUTTONS
KEY
ACTION
SHIFT ACTION
LEFT BUTTONS
KEY
ACTION
SHIFT ACTION
RIGHT BUTTONS
KEY
ACTION
SHIFT ACTION
BOTTOM BUTTONS
KEY
ACTION
SHIFT ACTION
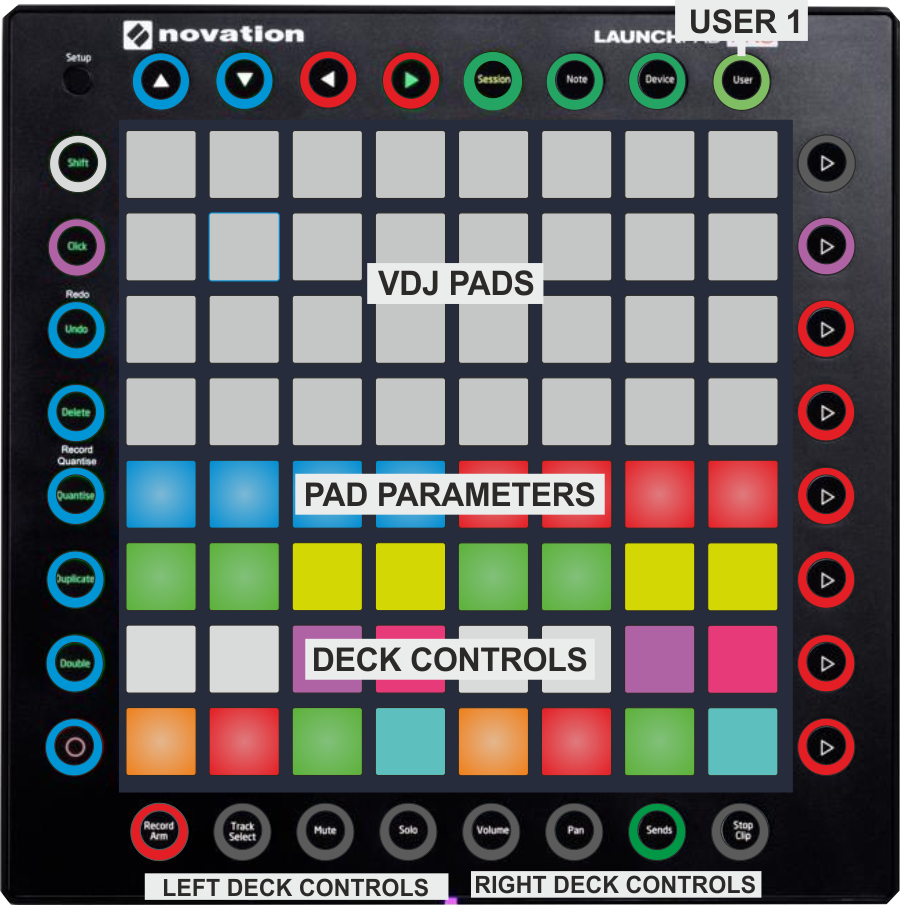
USER MODE
Press the top USER button, to set the device to User mode
PADS
KEY
ACTION
SHIFT ACTION
TOP BUTTONS
KEY
ACTION
SHIFT ACTION
LEFT / RIGHT BUTTONS
KEY
ACTION
SHIFT ACTION
BOTTOM BUTTONS
KEY
ACTION
SHIFT ACTION
CUSTOM USER MODES
The User mode (provided with the Top USER button) offers 6 different User modes. Those are selected by holding down the SETUP button and select one of the blue colored Pads 1 to 6 as per the image below. Each one of the 6 user modes represent a different Midi channel. The left side red colored pads represent the default midi channels of the unit and those are reserved and cannot be selected.

User mode 1 functionality is pre-mapped and described in the User Mode section of this manual.
User mode 2 functionality is pre-mapped and offers OS2L commands 1 to 64 for the pads and no other action assigned at the top/bottom/left/right buttons.
User modes 3 to 6 are un-assigned and can be assigned to whatever VDJ actions you need.
Notes:
- After each time you select a User mode, you need to press the USER button at the top so that the status of the leds get refreshed.
- The User (Midi Channel) mode selection is memorized, so if the User 2 mode is selected, then use one of the SESSION, NOTE or DEVICE buttons at the top to go to a different mode and then back to USER, the previously selected User mode will be offered.
STANDALONE & MIDIIN DEVICES
The Launchpad Pro is detected as 3 different Midi devices as shown in the Controllers tab of VirtualDJ Settings and those represent a pair of Midi In/Out ports. The Novation Launchpad Pro (default device) and the Novation Launchpad Pro Standalone offer similar functionality as described in this manual, with Sampler, Effects, Mixer and Deck Control modes. The MidiIN device has no MIDI functionality and is mostly used to send and receive Midi Clock signals, to synchronize external devices and applications.
- How to select a device
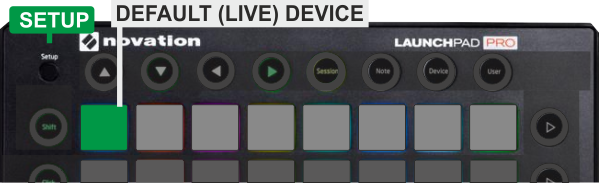
To select the Standalone device, hold down the SETUP button and then press Pad Nr.5 (orange).
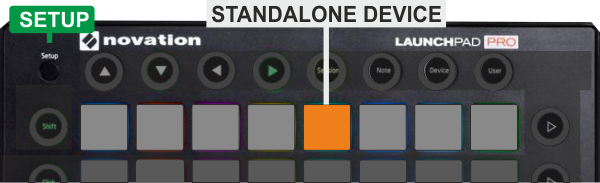
To select the default (also known as "Live") device press the SETUP button and then press Pad Nr.1 (green)
Notes:
- The other 3 colored pads (2,3 and 4) should not be selected.
- The default (Live) device is selected by default each time VirtualDJ starts
- How useful is to have 2 devices offering the same functionality ?
You may need to control 2 different applications with the same device. E.g. controlling VirtualDJ and a DMX software (without OS2L support) or other DAW application. In this case, you can set one of the 2 devices to "Ignore" and prevent VirtualDJ to receive and send Midi notes from this device, leaving it "free" to be chosen from the 3rd party software of your choice.

STANDALONE DEVICE
More specifically, the Standalone device offers...
- Effects mode when the NOTE button is pressed, with the exact functionality as described in the Effects mode
- Mixer mode when the DEVICE button is pressed, with the exact functionality as described in the Mixer mode
- Sampler mode when the USER button is pressed and the USER Channel 1 is selected, as described in the Sampler mode
- Pads and Deck Controls mode when the USER button is pressed and the USER Channel 2 is selected as described in the User mode
- OSL2 functionality when the USER mode button is pressed and the USER Channel 3 is selected.
- No functionality when the SESSION button is pressed.
- No functionality (can be customized) when USER mode button is selected and one the USER Channels 4 to 16 is selected.
The Standalone device offers 16 different User modes (Midi channels), and those can be selected by pressing the SETUP button and then select any of the 16 blue colored pads as shown in the image below.

Notes:
- After each time you select a User mode, you need to press the USER button at the top so that the status of the leds get refreshed.
- The User (Midi Channel) mode selection is memorized, so if the User 2 mode is selected, then use one of the NOTE or DEVICE buttons at the top to go to a different mode and then back to USER, the previously selected User mode will be offered.
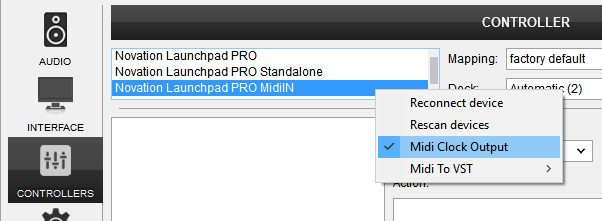
MIDIIN DEVICE
The 3rd available device - Novation Launchpad Pro MIDIIN - is not offering any mapping, nor any Pad or button offers MIDI In/Out functionality. The only purpose of this device is to be used to send and receive Midi Clock signals, in order to synchronize an external device (using the MIDI OUT socket at the rear side of the unit), or 3rd party applications.
For this purpose, you will need to enable Midi Clock Output from Controllers tab of VirtualDJ for this device (right-click option)
ADVANCED SETUP
The Launchpad Pro offers a Setup mode while the top-left SETUP button is pressed. The Setup mode is used to select a device/mode, select a User Mode Midi Channel, enable/disable Velocity etc.

DEVICE/MODE SELECT
As explained in other chapters of this manual, the Launchpad Pro offers 2 different devices (MIDI port pairs) and several modes, some of them are hardware layers. The devices and modes can be selected by pressing the SETUP button and one of the first 5 top-left Pads as per the image above.
- Pad 1 : Default device - Live mode. Selects the default LaunchPad Pro device (also known as the Live mode). This device is selected by default when VirtualDJ starts.
- Pad 2 : Default device - Note mode. Selects the Note mode for the default Device. In this mode, the Pads and buttons send Midi messages similar to the Live mode, but in different and sometimes weird order, so it is strongly advised not be used/selected, or else the VirtualDJ functionality may be awkward
- Pad 3 : Default device - Drum mode. Selects the Drum mode for the default Device. In this mode, the Pads and buttons send Midi messages similar to the Live mode, but in different order - grouped in blocks in a way - so it is strongly advised not be used/selected, or else the VirtualDJ functionality may be awkward
- Pad 4 : Default device - Fader mode. Selects the Fader mode for the default Device. In this mode, the Pads send Midi messages per columns, simulating 8 vertical faders. This mode is used for the Mixer and Effects modes as described in this manual, and are selected via the NOTE and DEVICE mode buttons.
- Pad 5 : Stand-Alone device Selects the Stand-Alone Device (the one detected as LaunchPad Pro Standalone in VirtualDJ Controllers tab). When this device is selected, MIDI messages will be only received from the unit and not the Live/default one.
VELOCITY
The unit offers 2 kind of velocity for the 64 Pads
- Touch Velocity messages which returns how hard the pad was initially pressed
- After-Touch Velocity messages which continuously return how hard the pad is pressed at the moment.
Each one of the above velocity messages is available in VirtualDJ, are pre-assigned mostly to Sampler Volumes and both can be enabled/disabled from the Device Setup mode.
As shown in the image above, use the 4 Touch Velocity pads to turn off Touch Velocity (white pad) or one of the other 3 green pads, which determine how hard the Pad needs to be pressed initially to offer the maximum velocity value
Use the After-Touch Velocity pads to turn off After Touch Velocity (white pad) or to enable it using the POLY green pad. The CHAN After-Touch Velocity mode offers a global After-Touch message, regardless which Pad is pressed, which is not defined or can be used within VirtualDJ, thus it should not be selected.
If After-Touch Velocity is enabled, you can select one of the 3 Thresholds (Low, Medium or High) which determine how the velocity curve is handling the after-touch velocity messages.
MIDI CHANNELS SELECT
Each Launchpad Pro device (Live and Stand-Alone) offers 16 different Midi Channels, and those are mostly used to select one of the User modes. The red-colored Pads as shown in the image above, represent the reserved Midi Channels and those cannot be selected. The blue-colored pads represent the custom user mode channels and those can be selected to offer User modes 1 to 6 (for the Live device) and 1 to 16 for the Stand-Alone one.
